Designing accessible Augmented Reality rapid prototyping tools for non-technical designers
Designing accessible Augmented Reality rapid prototyping tools for non-technical designers
Designing accessible Augmented Reality rapid prototyping tools for non-technical designers
Really
Really
TEAM
TEAM
Self Initiate Project
Self Initiate Project
Self Initiate Project
ROLE
ROLE
Researcher,
UX Designer,
Prototyper
Researcher, UX Designer, Prototyper
Researcher,
UX Designer,
Prototyper
DURATION
DURATION
4 Months
3 Months
4 Months
PROBLEM
PROBLEM
High level technical complexities
Designers rely on low-level programming tools to create AR experiences. The steep learning curve limits the creative freedom and need to depends on software engineer to bring ideas to life.
Time consuming for 3D model creation
While 3D model are part for AR experiences, creating them is often slow and requires advanced skills in tools like texturing and rendering. This made it difficult to quickly prototype and test ideas during design process.
OUTCOME
OUTCOME
Designed a drag-and-drop iPad application that enable designers upload, preview, and share 3D jewelry models to clients, without the need to write any code.
Designed a drag-and-drop iPad application that enable designers upload, preview, and share 3D jewelry models to clients, without the need to write any code.
Designed a drag-and-drop iPad application that enable designers upload, preview, and share 3D jewelry models to clients, without the need to write any code.
FINAL DESIGN
FINAL DESIGN
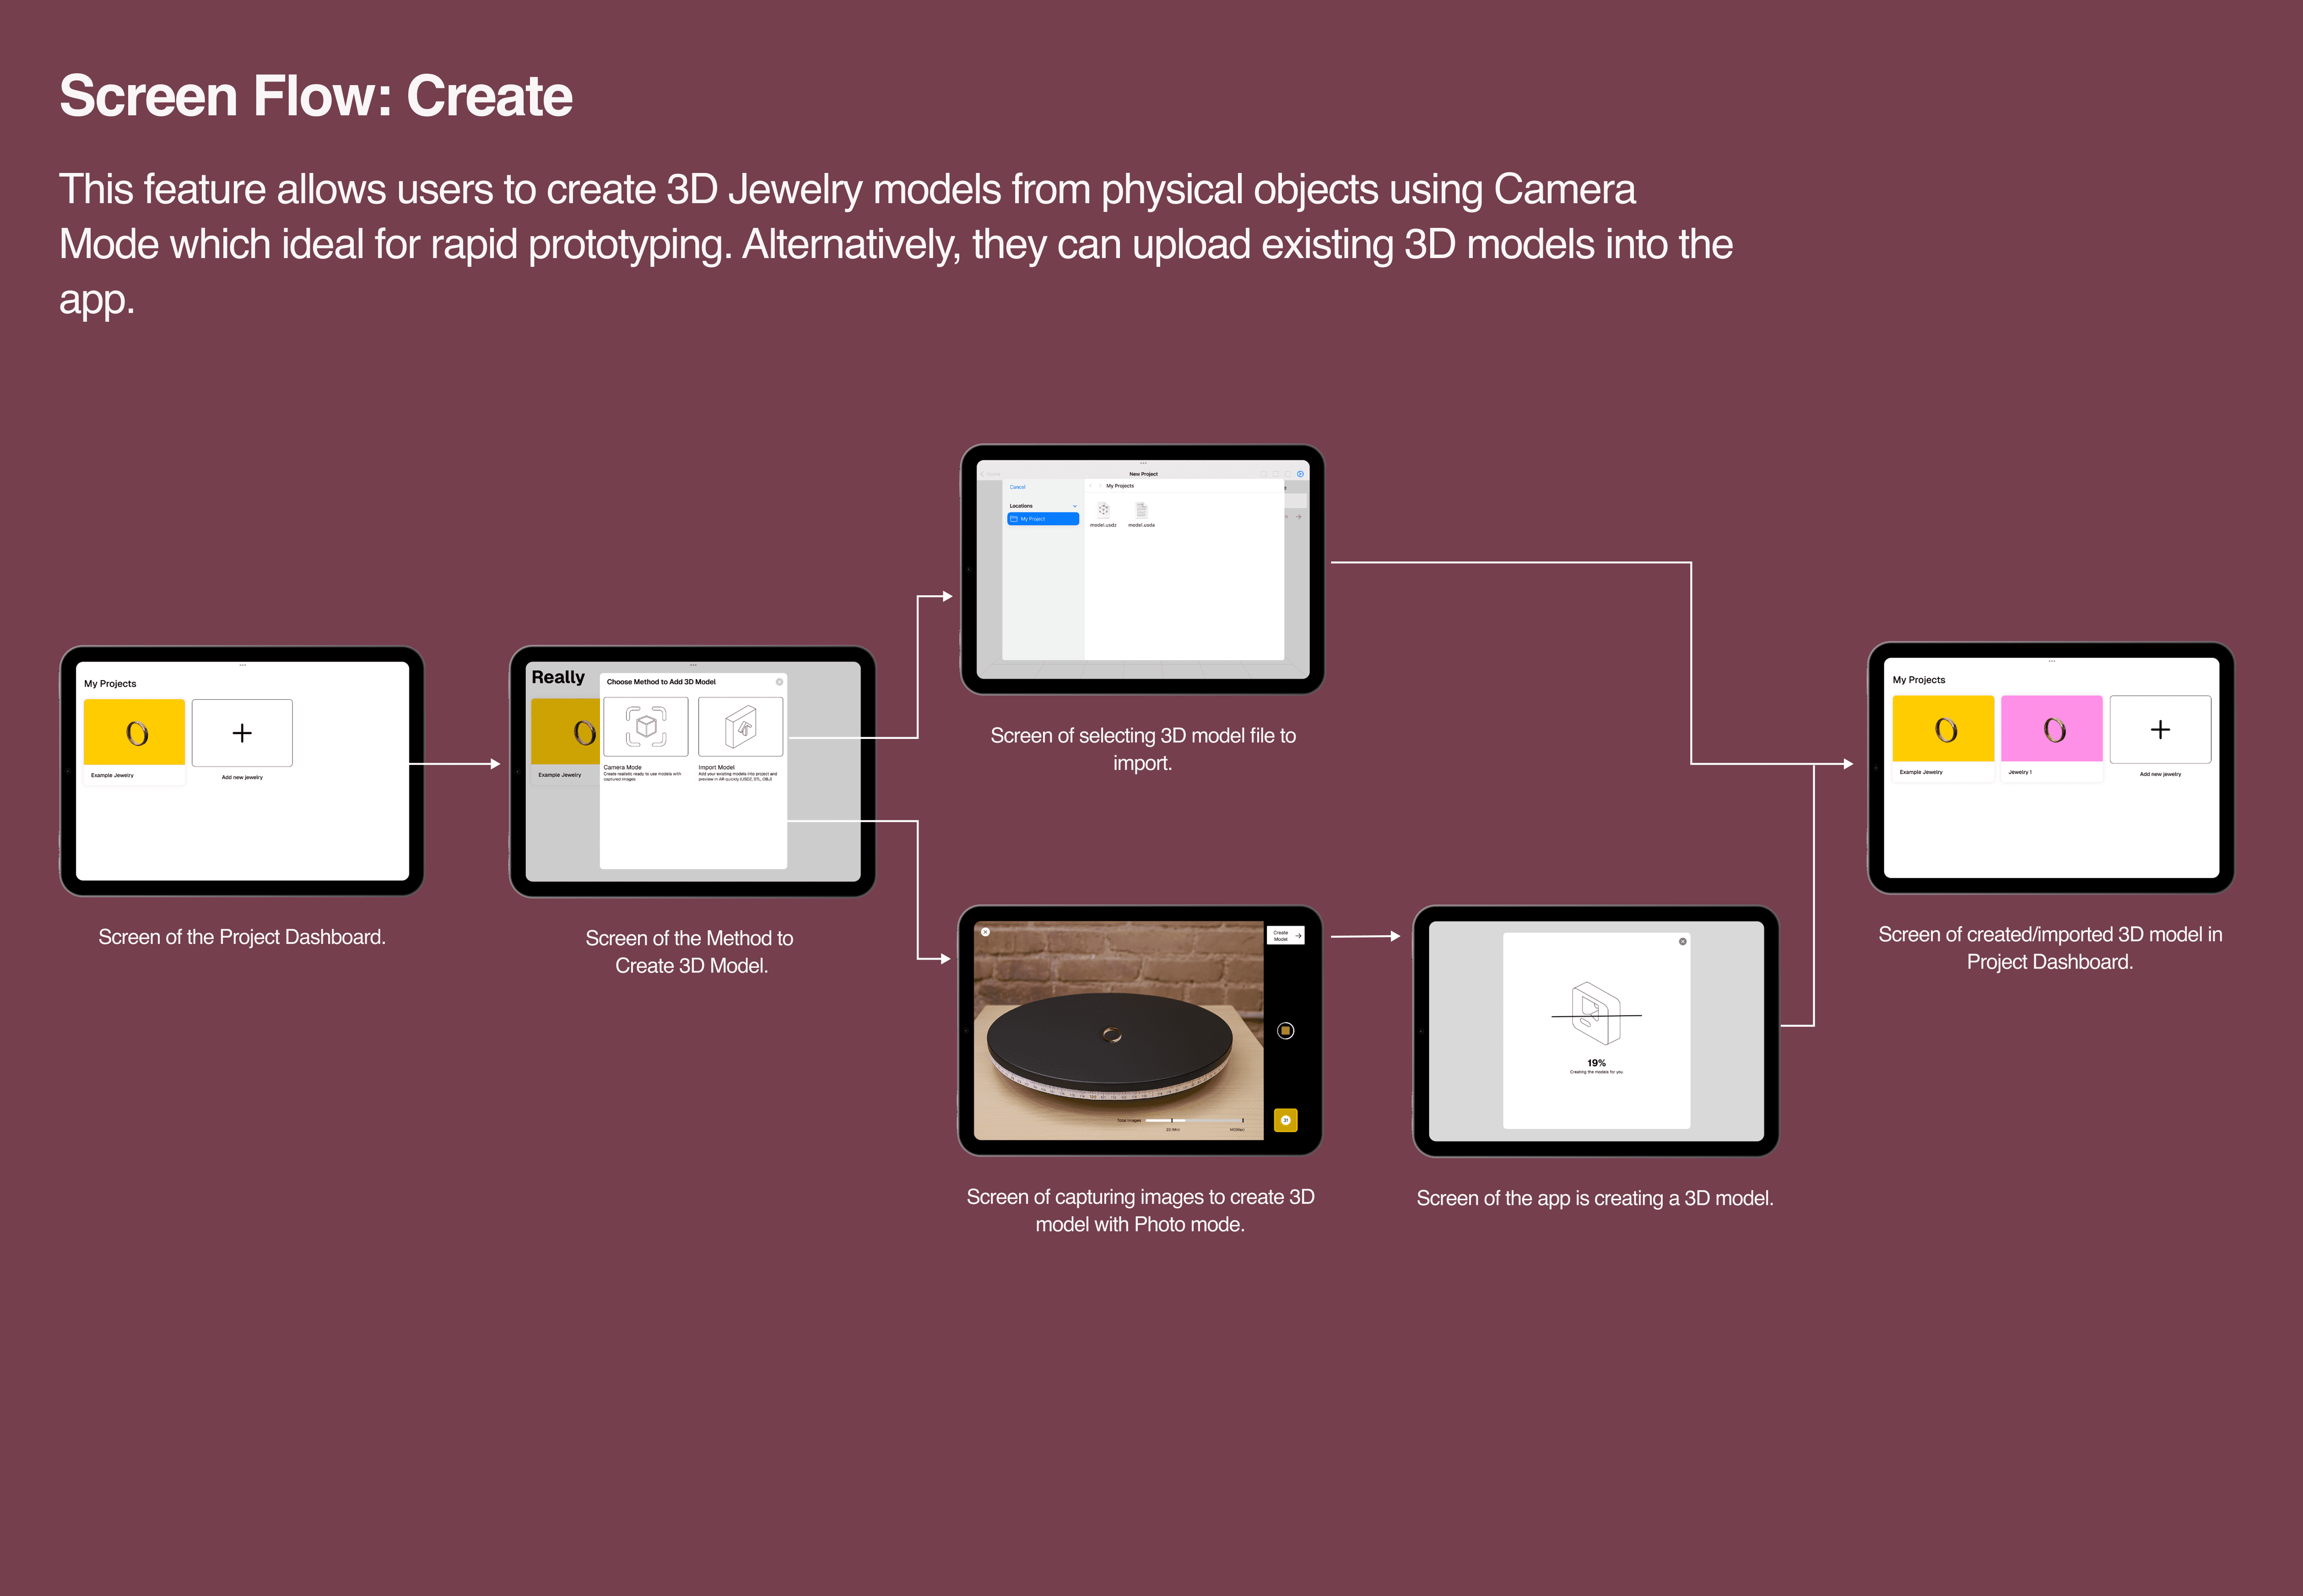
Create Digital 3D Models from Physical Jewelry
Create Digital 3D Models from Physical Jewelry
Create Digital 3D Models from Physical Jewelry
Make prototype-ready 3D models by capturing or upload images, using photogrammetry API to turn them into assets. Alternatively, users can upload existing 3D models directly into the app.
Make prototype-ready 3D models by capturing or upload images, using photogrammetry API to turn them into assets. Alternatively, users can upload existing 3D models directly into the app.
Both experience unified under “Learn & Earn” section, allow for users easily view invites and earnings in one place.
UX writing was improve for content accessibility and clarity
Integrated into mobile app as WebView to increase feature discoverability and usability.

Preview Designs in AR and 3D
Preview Designs in AR and 3D
Preview Designs in AR and 3D
Evaluate design aesthetics of 3D Jewelry Models in Augmented Reality (AR) and refine prototypes by adjust properties such as scale and rotation in non-AR preview.
Evaluate design aesthetics of 3D Jewelry Models in Augmented Reality (AR) and refine prototypes by adjust properties such as scale and rotation in non-AR preview.
Both experience unified under “Learn & Earn” section, allow for users easily view invites and earnings in one place.
UX writing was improve for content accessibility and clarity
Integrated into mobile app as WebView to increase feature discoverability and usability.
Collaborative AR Jewelry Try-Ons
Collaborative AR Jewelry Try-Ons
Collaborative AR Jewelry Try-Ons
Share experience for others to try and evaluate the jewelry prototypes in AR and allow instant feedback for jewelry design refinement.
Share experience for others to try and evaluate the jewelry prototypes in AR and allow instant feedback for jewelry design refinement.
Both experience unified under “Learn & Earn” section, allow for users easily view invites and earnings in one place.
UX writing was improve for content accessibility and clarity
Integrated into mobile app as WebView to increase feature discoverability and usability.
IMPACTS
As I worked on this project, the design solution successfully met lowered the barrier for non-technical designers to begin creating and prototyping AR Jewelery experiences specifically Jewelry.
Both experience unified under “Learn & Earn” section, allow for users easily view invites and earnings in one place.
UX writing was improve for content accessibility and clarity
Integrated into mobile app as WebView to increase feature discoverability and usability.

OUTCOMES
IMPACTS
IMPACTS
PROCESS
Research, Analysis & Insights
Research, Analysis & Insights
Research, Analysis & Insights
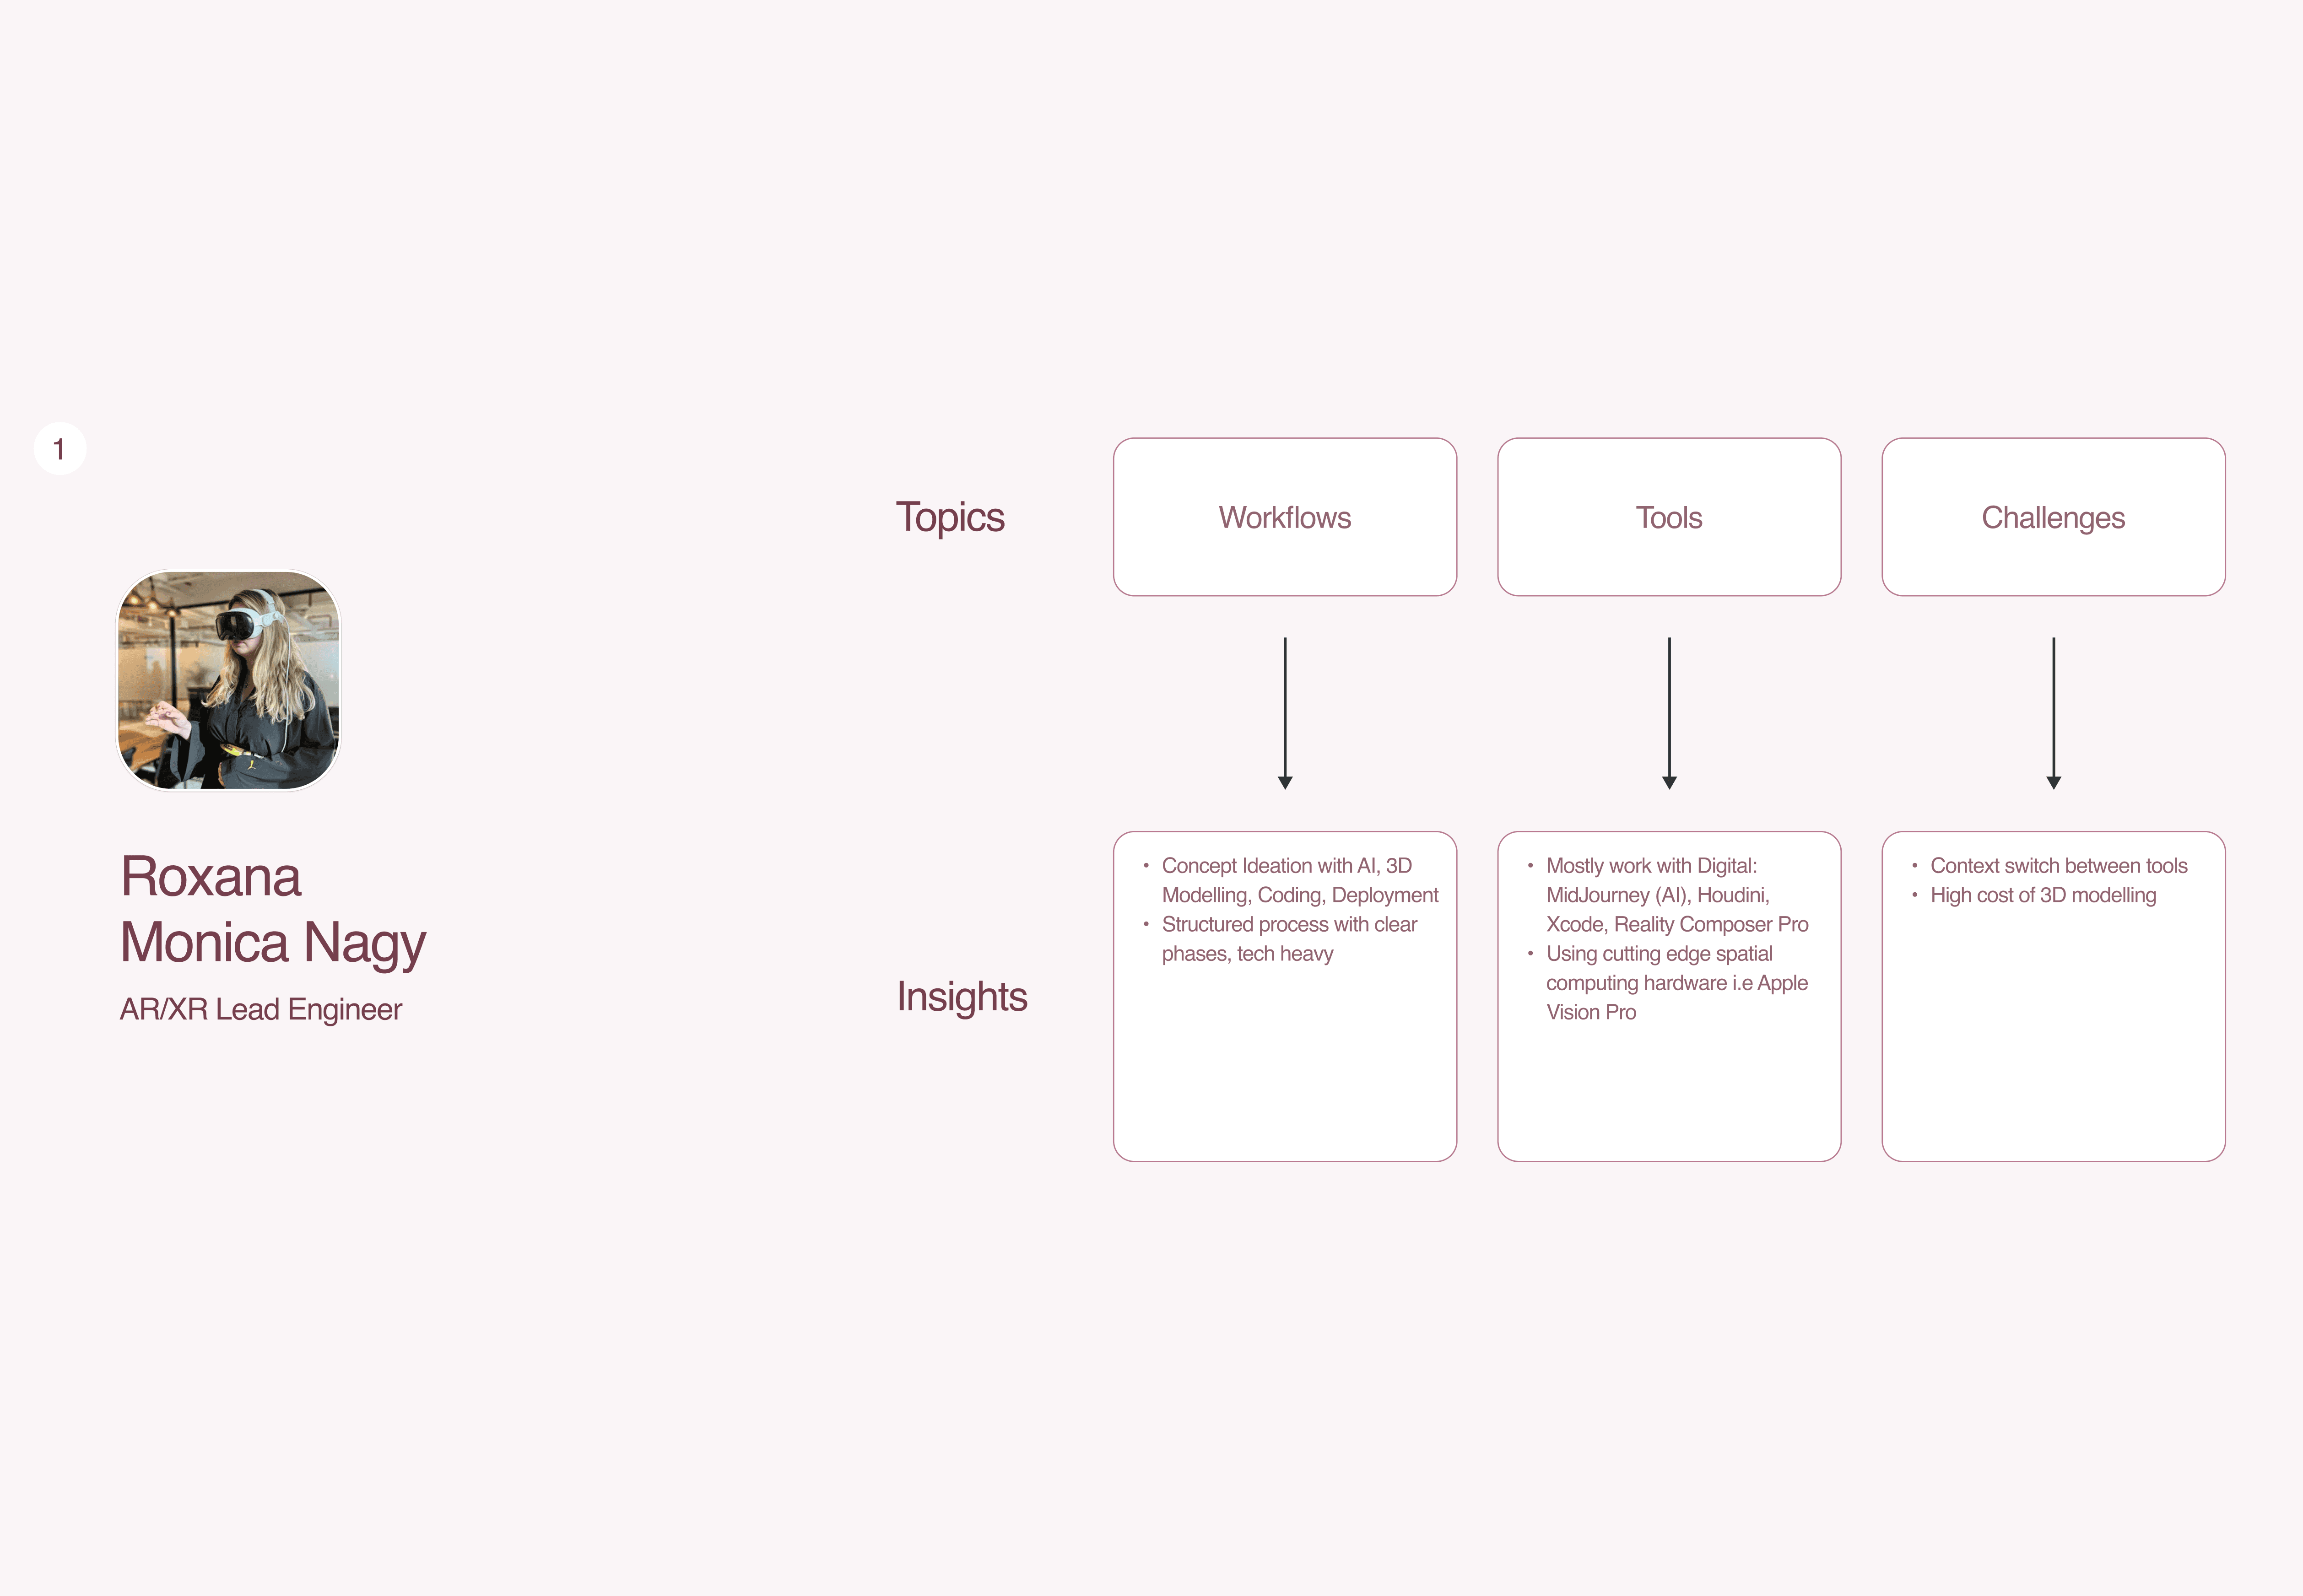
To support my desk research and guide the direction of my solution, I conducted User Interviews with 2 experts from my project’s target audience: AR/XR Lead Engineer and Independent Jewelry Designer. The goals are to focus on understanding their workflows, tools, and key challenges during their design and creation process.
From these interviews, I synthesized the findings into User Personas, which represent each individual's goals, interests, pain points, and challenges within their discipline.
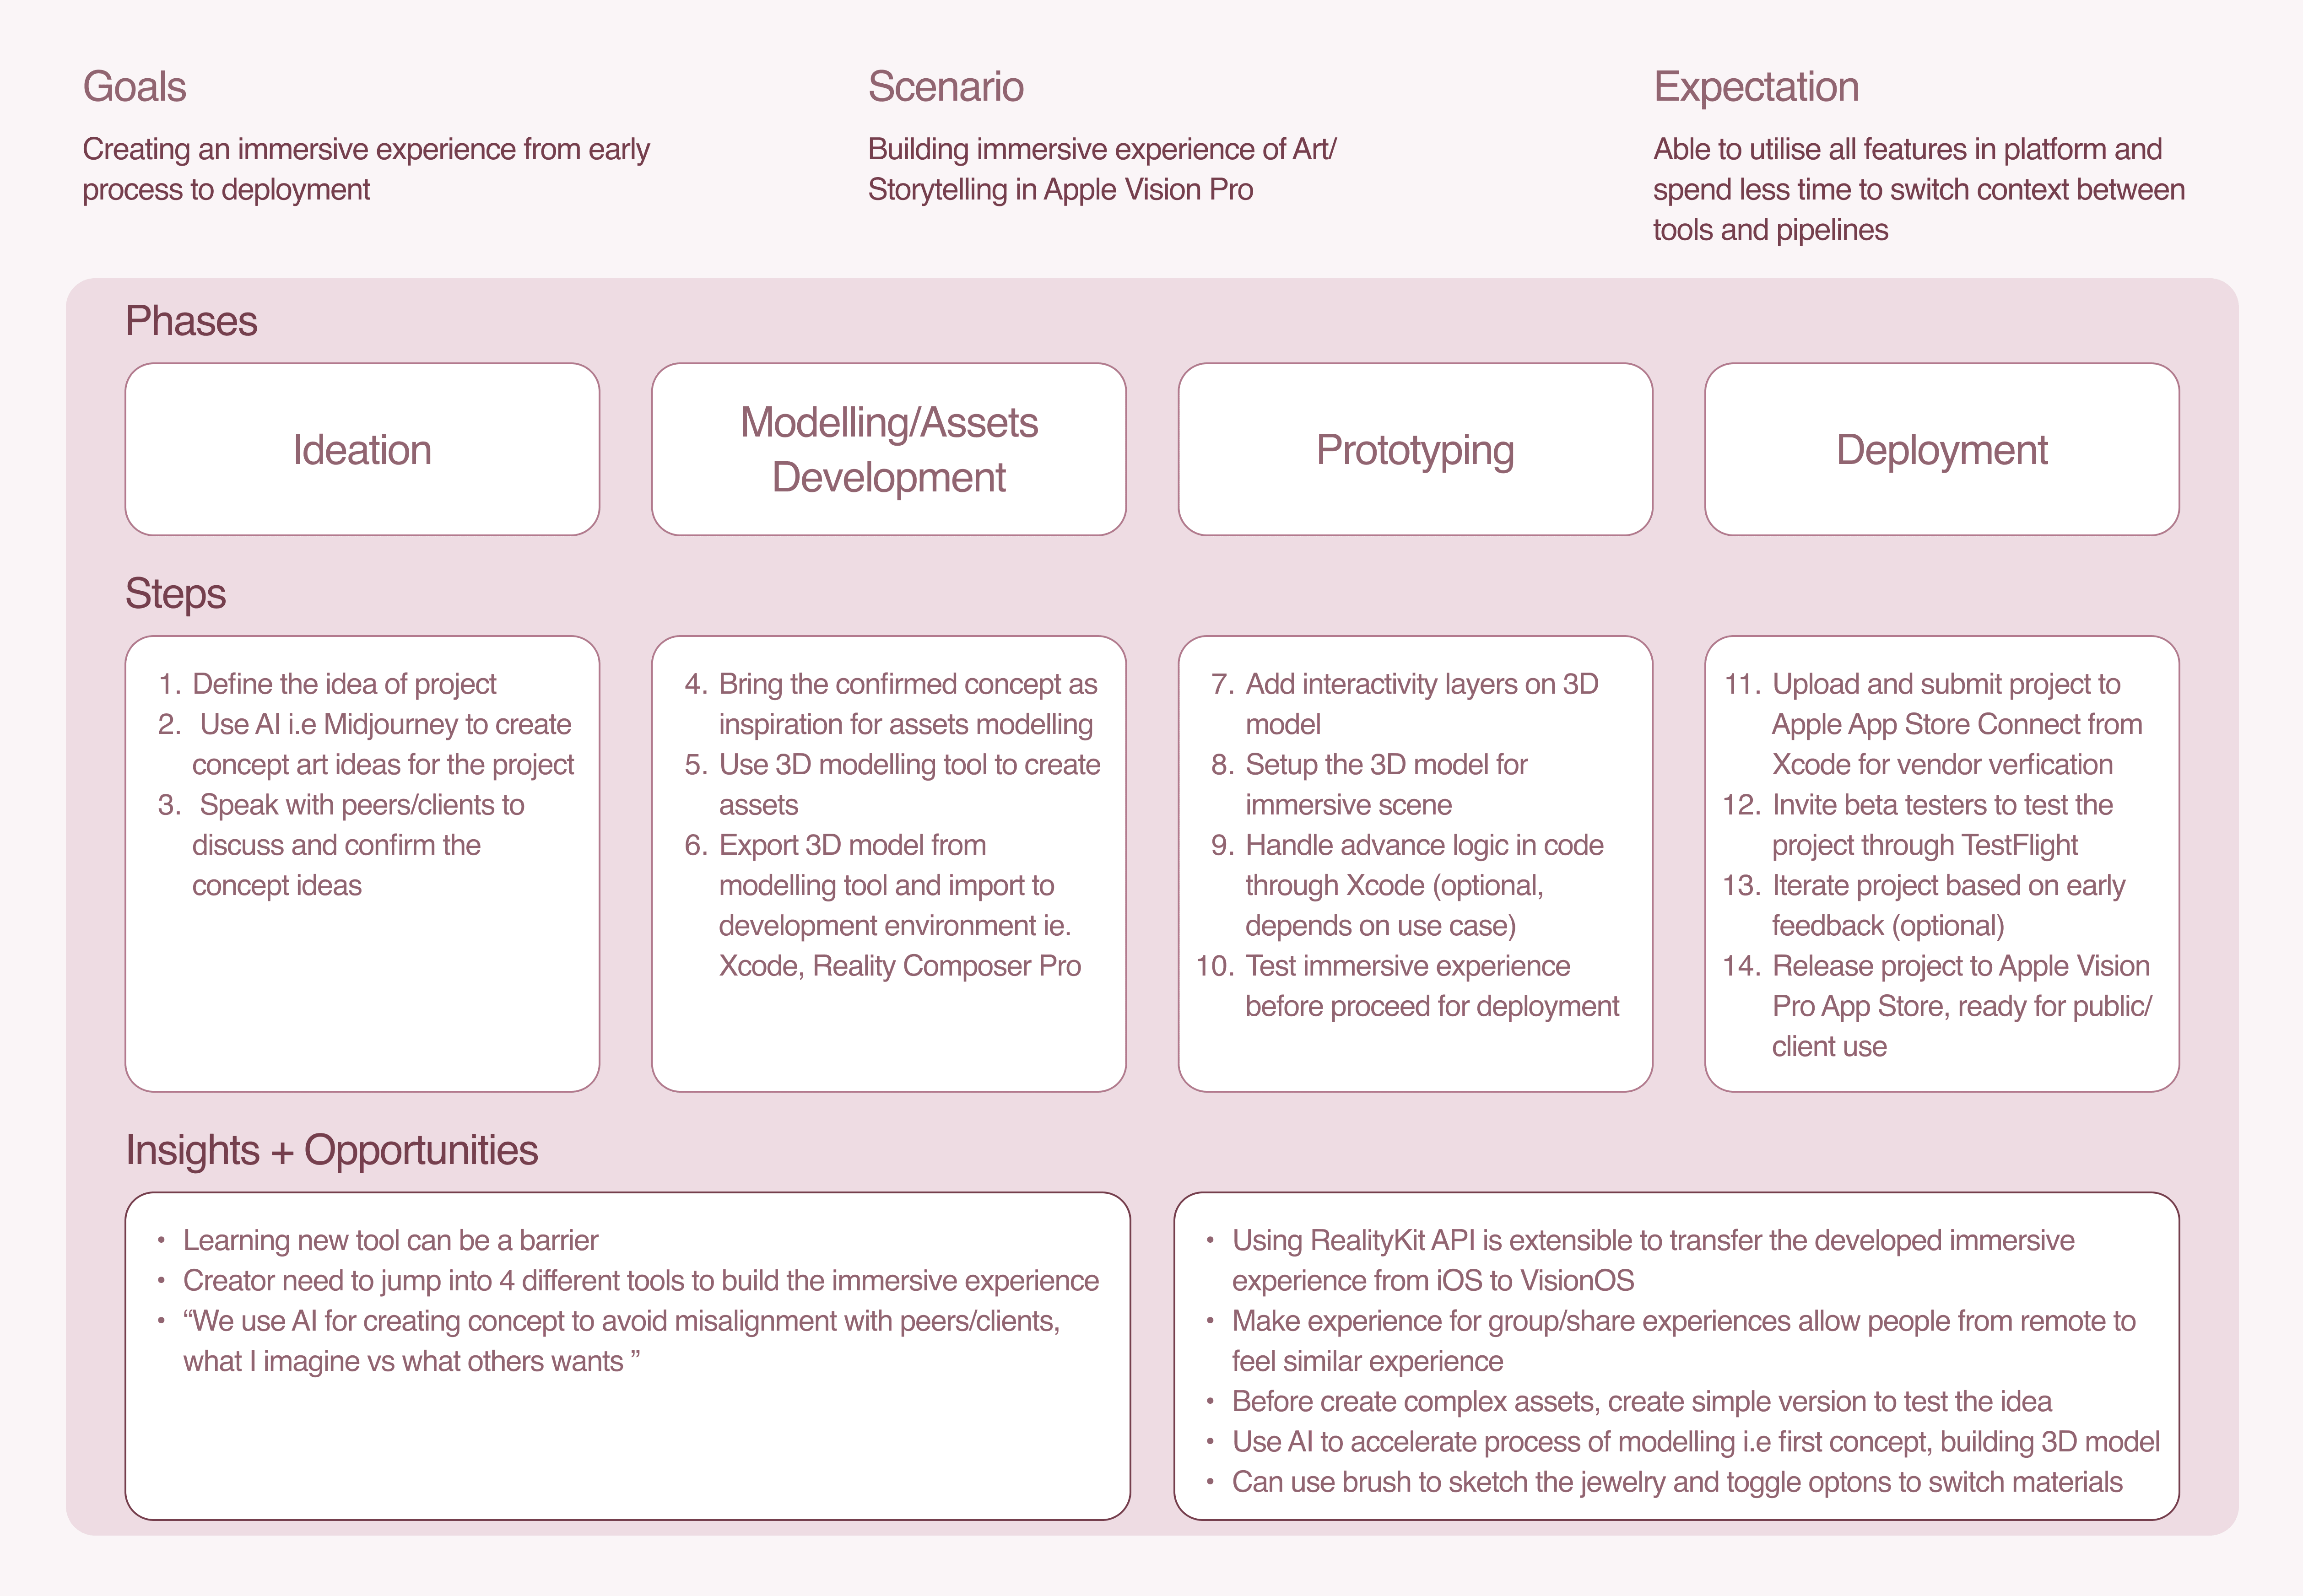
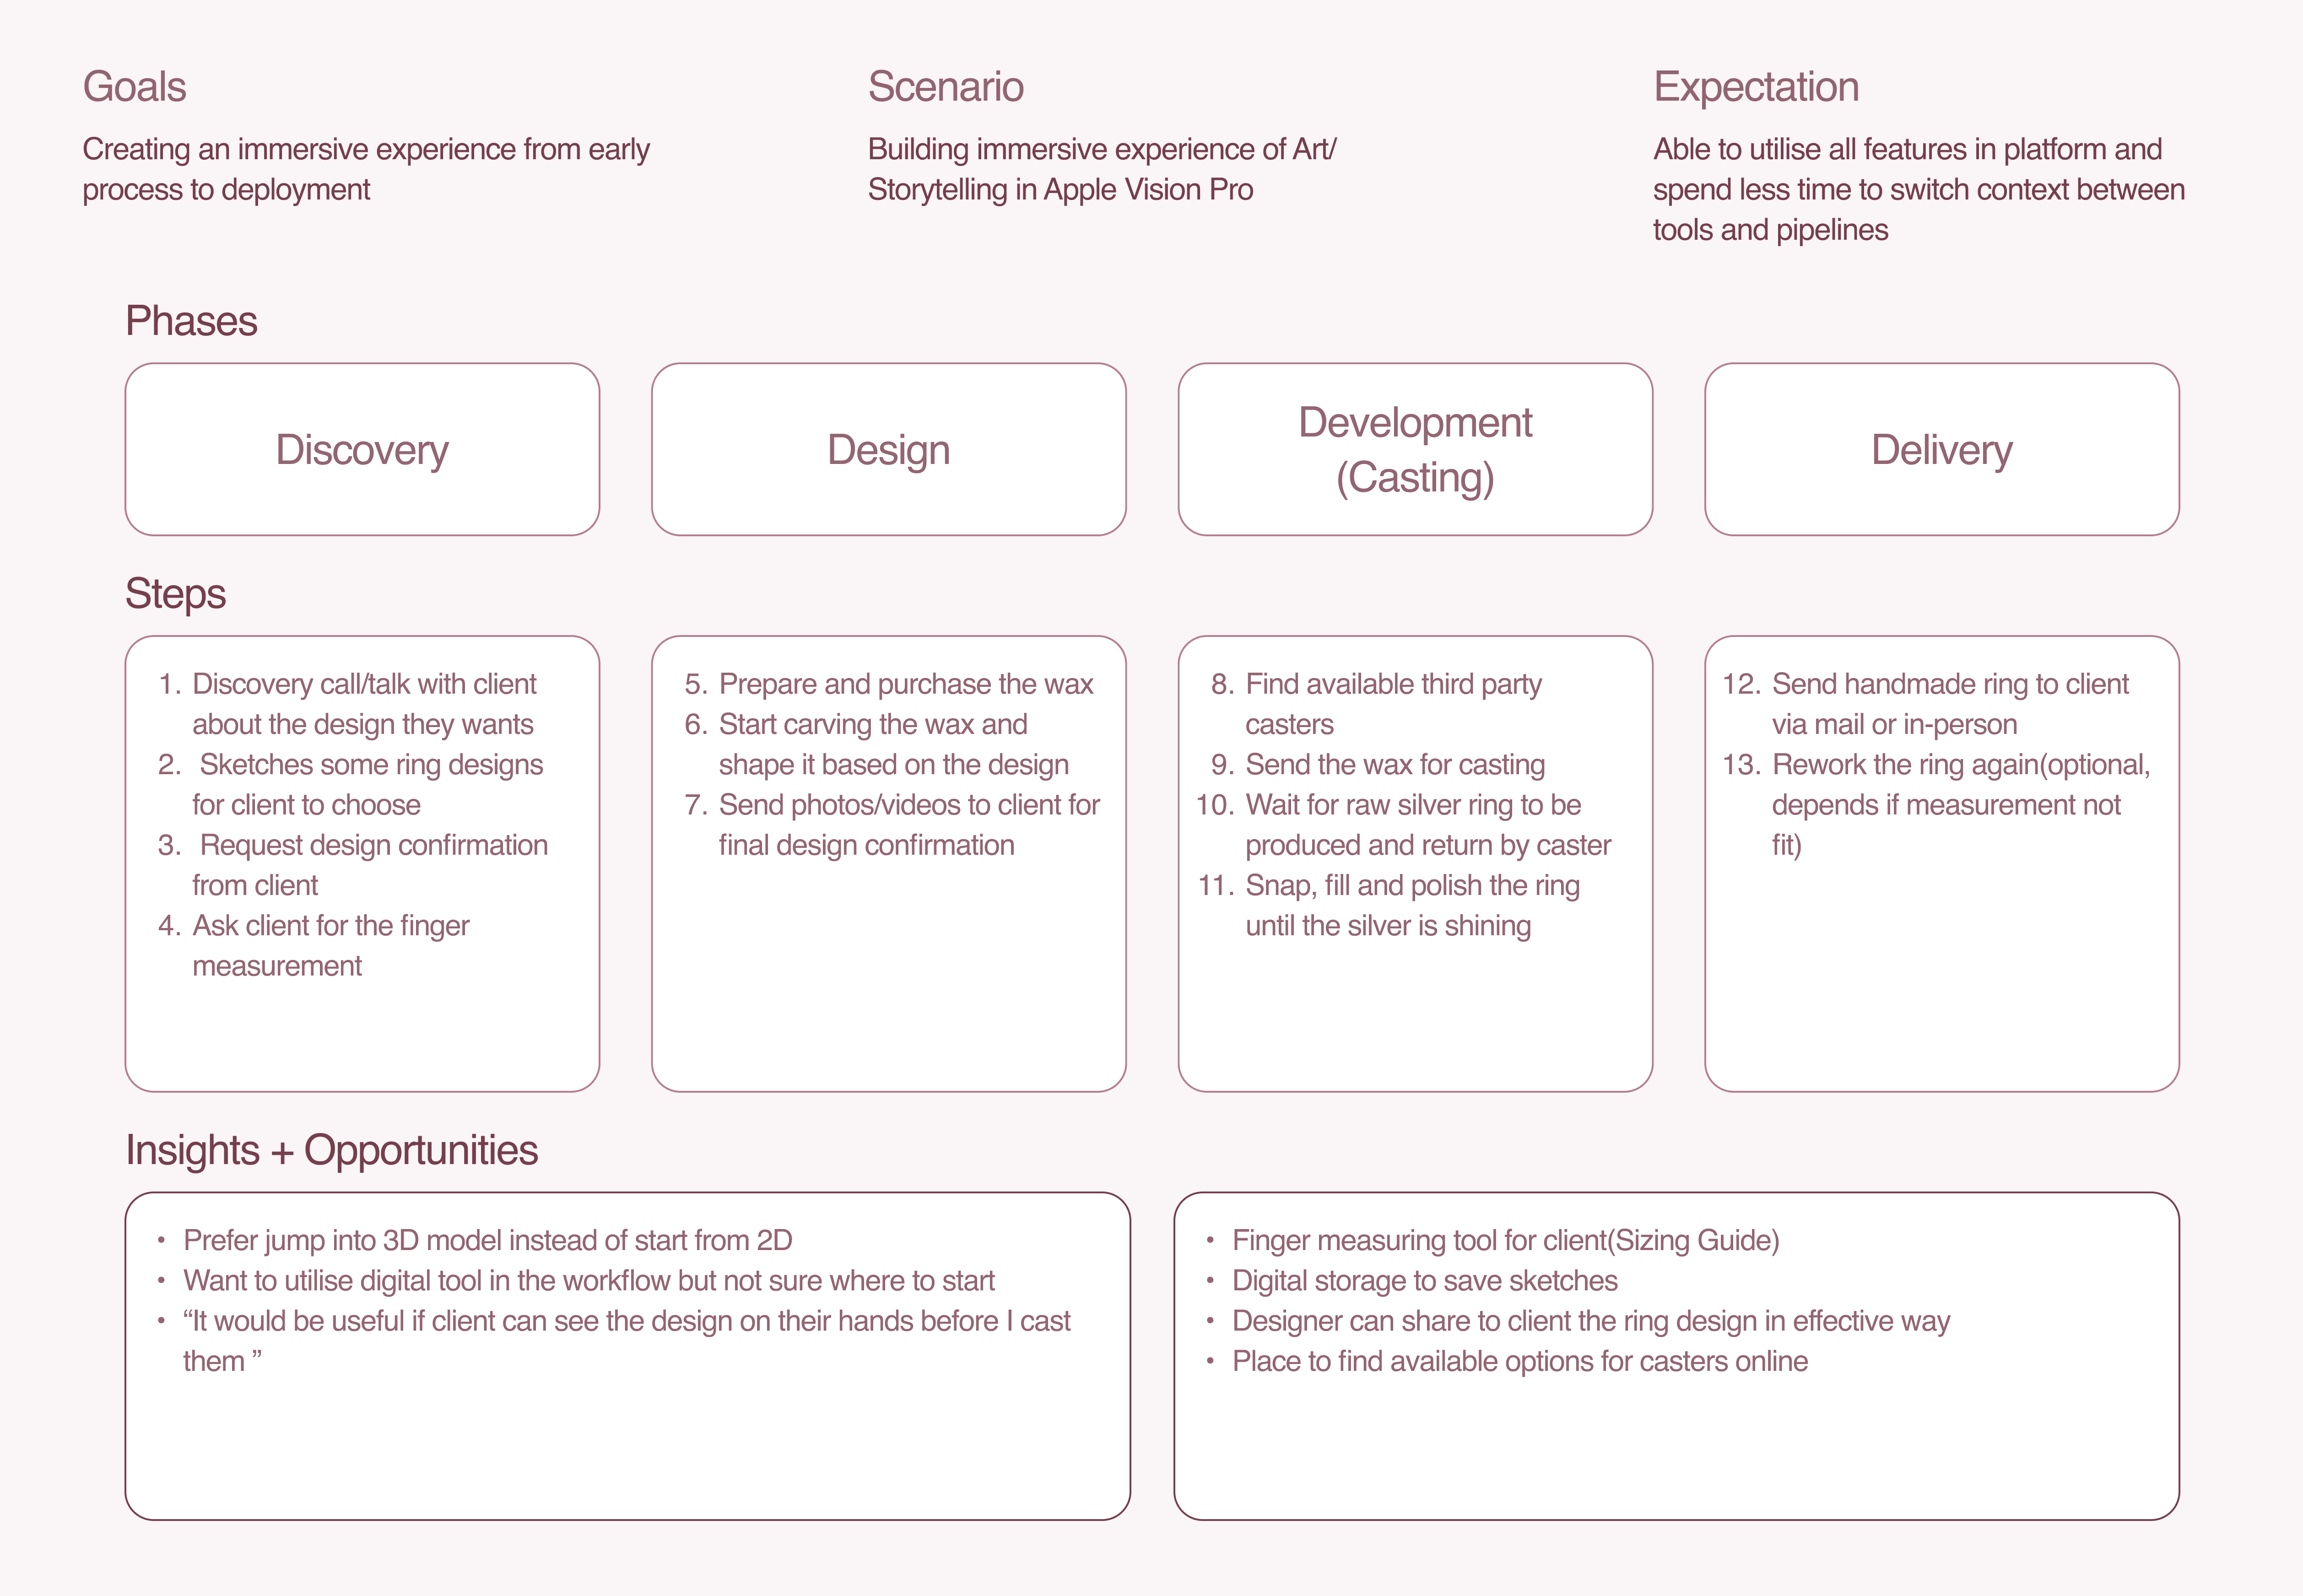
Additionally, I mapped out User Journeys to visualize the high level overview of their workflows. This helped me identify key insights and opportunities that directly inform my design approach..
To support my desk research and guide the direction of my solution, I conducted User Interviews with 2 experts from my project’s target audience: AR/XR Lead Engineer and Independent Jewelry Designer. The goals are to focus on understanding their workflows, tools, and key challenges during their design and creation process.
From these interviews, I synthesized the findings into User Personas, which represent each individual's goals, interests, pain points, and challenges within their discipline.
Additionally, I mapped out User Journeys to visualize the high level overview of their workflows. This helped me identify key insights and opportunities that directly inform my design approach..
Industry Experts 1
Industry Experts 1
Industry Experts 1

Industry Experts 2
Industry Experts 2
Industry Experts 2


Design Statement
Design Statement
Design Statement
From these research findings, I concluded with a design statement within User Stories format to outlines the core pain points and guides the development of my design solution.
From these research findings, I concluded with a design statement within User Stories format to outlines the core pain points and guides the development of my design solution.
From these research findings, I concluded with a design statement within User Stories format to outlines the core pain points and guides the development of my design solution.

Ideating key features with Crazy 8's
Ideating key features with Crazy 8's
Ideating key features with Crazy 8's
Utilise Crazy 8’s exercise to explore initial design ideas and prioritise the MVP of the application.
Utilise Crazy 8’s exercise to explore initial design ideas and prioritise the MVP of the application.
Utilise Crazy 8’s exercise to explore initial design ideas and prioritise the MVP of the application.
Takeaways
The sketches were shared with peers to gather design feedback and ensure alignment with user needs and project scope. From this feedback, the key design directions of application included:
1. Preview ring aesthetics in AR
Allow user preview and virtual communication of ring design.
Take images for 3D model
Enable users to create 3D models from physical to digital quickly for rapid prototyping.
Import and share 3D model of the project
Allow user to use existing ring 3D models and share for AR preview.

Identifying the key interactions
Identifying the key interactions
Identifying the key interactions
The key screens were defined based on MVP features, and wireframes were used to reimagine the application flow while distinguishing essential elements from nice-to-have features.
The key screens were defined based on MVP features, and wireframes were used to reimagine the application flow while distinguishing essential elements from nice-to-have features.
The key screens were defined based on MVP features, and wireframes were used to reimagine the application flow while distinguishing essential elements from nice-to-have features.

SOLUTIONS
SOLUTIONS
Designing the application interfaces
Designing the application interfaces
Designing the application interfaces
I designed the high-fidelity screens and detailed the screen flow. To speed up visual development, I used the Gumroad Design System due its design language that emphasize simplicity and impactul which align with core focus of the app.
I designed the high-fidelity screens and detailed the screen flow. To speed up visual development, I used the Gumroad Design System due its design language that emphasize simplicity and impactul which align with core focus of the app.
I designed the high-fidelity screens and detailed the screen flow. To speed up visual development, I used the Gumroad Design System due its design language that emphasize simplicity and impactul which align with core focus of the app.


Iterating design based on Usability Test results
Iterating design based on Usability Test results
Iterating design based on Usability Test results
To evaluate the usability and visual hierarchy of my high-fidelity design, I conducted tests through both in-person sessions and remote testing via Maze. Participants need to complete the tasks using interactive prototype which allows me to observe their interactions, identify pain points, and gather actionable feedback.
Usability Test Key Insights
Clean visual design
5 partipants found the interface simple, clean and easy to navigate
Share feature hard to discover
2 participants struggle to locate the share option
Unclear labels in dasboard page
Terms like "Example Ring" on the card design were confusing
Improve the discoverability of Share option
Improve the discoverability of Share option
Improve the discoverability of Share option

❌
❌
Share option was hidden in nested navigation, which made it difficult for users to find and use efficiently.
Share option was hidden in nested navigation, which made it difficult for users to find and use efficiently.

✅
✅
Share option is placed in both the Dashboard and AR Preview, giving users flexibility to choose when and where to share.
Share option is placed in both the Dashboard and AR Preview, giving users flexibility to choose when and where to share.
Refined UX writing for labels in dashboard page
Refined UX writing for labels in dashboard page
Refined UX writing for labels in dashboard page

❌
❌
The example jewelry project in dashboard was labeled "Example Jewelry," which confused users and lacked context.
The example jewelry project in dashboard was labeled "Example Jewelry," which confused users and lacked context.

✅
✅
The label was changed to "Jewelry 1" to clearly indicate it is a sample project, making it easier for users to recognize at glance.
The label was changed to "Jewelry 1" to clearly indicate it is a sample project, making it easier for users to recognize at glance.
REFLECTIONS
REFLECTIONS
What did I learn?
What did I learn?
What did I learn?
Validate early assumptions. Usability testing results revealed that participants struggled to find the share option, which was hidden in other screens. Initially, I thought sharing would only happen during the AR preview stage but, users also expressed the need to share their experience earlier in the process.
Iterated on design. To make the card content easier to understand, I added a share option directly on the project card in the dashboard and renamed the default project from “Example Jewelry” to “Jewelry 1.”
Opportunities
Opportunities
Opportunities
Evolve the platform into a fully functional native application with additional time and resources.
Expand the digital experience beyond iPad to devices like Apple Vision Pro, which offers higher-end capabilities for spatial computing and AR interactions.
Evolve the platform into a fully functional native application with additional time and resources.
Expand the digital experience beyond iPad to devices like Apple Vision Pro, which offers higher-end capabilities for spatial computing and AR interactions.
Evolve the platform into a fully functional native application with additional time and resources.
Expand the digital experience beyond iPad to devices like Apple Vision Pro, which offers higher-end capabilities for spatial computing and AR interactions.